Monday, July 18, 2011

Projects ahead...

Ahoy!  We are moving and I am very very excited to actually be committed to the same house for more than a year.  The house we are currently in was a short term house from the get-go so I never painted or
or thought to deeply about how I wanted the place to work.  Although we are not laying down permanent roots just yet, I am excited about this slightly long term plan.  I finally hopped on the Pinterest train and love how well it can organize my decor ideas.  I am not naturally talented in this department (I offer pretty much all of my past posts as evidence of this fact), but I know what I like.  So here is a taste of some posts to come.  Perhaps you more talented ladies can point me in the right direction paint and materials wise.


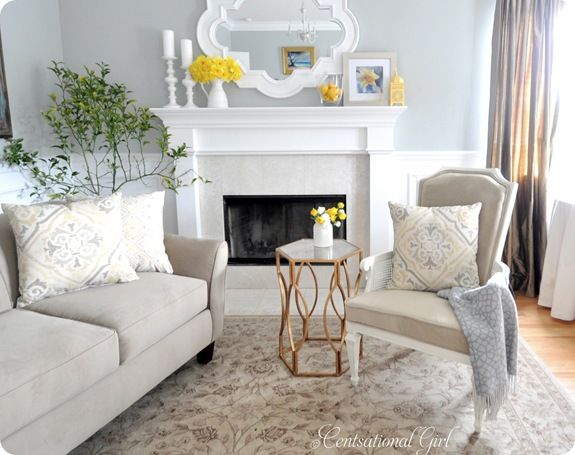
So the first room I'd like to work on is the living room.  It's got a great fireplace and is fairly small so it won't need a lot.
The current--apparently avantgarde-- tenant put his dining table in the living room but we'll go the traditional route.

Here's some room ideas I've liked.

Grey and White with pops of yellow...


  I also like the colors in these guys!


Any favorites?   I love input!

Tuesday, December 14, 2010

Recycled angels

This year we're making ornaments for most extended family members and here is our latest:
It's made entirely of things we had around the house (paper bag, newspaper, thread, and twine), which makes me very happy! I think we'll be personalizing the scroll with family members' names for future angels.

It's pretty straight forward, but I posted the whole process on my blog.

Monday, December 13, 2010

Simple Advent Calendar

I hand embroidered and hand-stitched our new Advent Calendar. It's simple and a little 'undone' looking - but that's just the way I wanted it! I have never hand embroidered something so I looked up a tutorial online. This isn't the exact tutorial, but it looks really helpful.
I lightly penciled in some numbers on the linen and then went over them with a split stitch.

For more of our simple ( lazy) 2010 Christmas decor click HERE.

Friday, October 15, 2010

halloween wreath

Well, I am not going to repost my recently painting ventures since that will take me way too long, but I will just share some links:


Those seem to count as things I have "Gussied Up" and I feel I have neglected this blog a bit... however, I am not the only one.  Here is a little craft I did recently with some friends so I thought I would share.


I have to say I would still be tempted to eat it if I didn't know it was covered in glue.  Good thing I have been keeping a bowl of them nearby when I feel the urge.  The inspiration came from HERE, but I mixed it up a bit mostly because I wasn't looking at the picture when I started mine.  I is just a dollar store wreath with black fabric wrapped around it.  Use hot glue to put on the candy corn and then seal it with decoupage.   However, I don't think this is going to keep beyond this year.

I really must be bored tonight.  Despite the fact that I have so many more important things I could be doing right now, I chose to blog tonight.  Can this baby come already?!

Tuesday, August 17, 2010

2 of my favs

I have been consistently dissatisfied with our living room pillows...until now. These are the result of a merging of 2 of my favorite things...Ikea (rugs 3.99) and Martha Stewart Living (July Issue). The fabric is super durable and I love the vintage-feel prints... much cheaper than buying the striped french linen & old feed sacks I was saving up for.
I'll be making more - but wanted to get the idea posted!


Thursday, July 15, 2010

I thought this was really cool

Print your own fabric at home. This might come in handy for all of you trying to personalize your new homes.

http://blog.craftzine.com/archive/2010/07/how-to_print_on_fabric_with_an.html

Tuesday, May 25, 2010

paint and carpet

Fresh Paint and new carpet are two things that can work wonders on an ugly room.
Goodbye Pink Shag and Skin-Toned Walls.
(We did this awhile ago, but I hadn't contributed in awhile.)

Thursday, May 13, 2010

Found Things: Part One

A string of very minor medical incidents has left us our family on a tight budget. It's been especially frustrating because I haven't been able to buy any supplies for the billions of sewing expeditions I have already begun in my head.

But the lack of funds have provided me with new visions of how to re-purpose items we already have in our house. It's sort of become a stimulating mental challenge for me.

Part One: The tin can----ister.
In an attempt to become ever-more financially savvy, I've started to set up a home office area in our ever-so-tiny bedroom. We used to have bills 'here', the computer 'there' and the file box 'somewhere else.'

But all we needed still was something to hold our little office odds and ends. So while whipping up a fresh marinara, I realized I could re-purpose the crushed tomato cans into something a bit more beautiful - using the scraps of this U.S. map paper I got from my all-time favorite paper store in Ann Arbor, MI.


I originally used the map in its entirety in my daughter's basement play area, then recently chopped it up to hang it here...over our couch.

Feels good to make something new without spending a dime.

Friday, May 7, 2010

A month of sewing

A friend of mine had twins in January and I am finally getting around to sending gifts for her older and younger children. I apologize in advance for the mess in the pictures but we are moving tomorrow and my apartment is in shambles.


Here is a blurry side shot of the bonnet for the five year old girl.

Here is the front.

This bonnet is for the girl twin. It took FOREVER to draft a pattern for it but I couldn't find a pattern I liked on the internet. I have used this one and would recommend it, it just wasn't quite what I was looking for for this bonnet. I also looked at this one.

I never thought of myself as a mom who would put a bonnet on her kids but I just found some great fabric and will be making some for my girls too.
This cap is for the 3 year old boy. It was super easy and I found the pattern here. Anyone could put this together in 2 hours or so.
This play mat is for the boy twin. Circles are a pain in the ass.
This fabric is the backing. I had been looking for a reason to buy it for a year or so and scrapped my previous gift idea just to use it.
And here is my longest labor of love. My nephew's T-shirt quilt.

Wednesday, March 31, 2010

EGG-cellent Easter Eggs


Aren't these beautiful?!! If you love dying Easter eggs like I do, try these out. They're easy and oh so fun to look at.

The credit for this idea goes to my mother-in-law. We made these a few days ago with a few of her friends. Martha Stewart also has these eggs on her website. See here.

Things you'll need:
-old silk ties
-muslin or white sheets (or pillowcases or old tablecloths)
-rubber bands or twist ties
-white eggs (uncooked)
-water
-vinegar
-a big ol' pot

1. Gather up some old silk ties and cut a few squares of muslin (big enough to wrap over an egg) (note: even cheapo ties are usually silk - unless, of course, they are obviously wool or cotton. My sister had a great idea to look at a thrift store since she doesn't have any ties lying around her apartment.)

2. Cut your tie into a piece big enough to wrap around your egg. Placing the egg on the shiny/good side of the tie scrap, wrap it up nice and tight. You want the tie pattern to be as snug against your egg as possible. (Careful, though, remember - the eggs are raw, so you don't want to break them.) Tie it off with a twist tie or rubber band.

3. Next wrap the egg again, this time with the muslin/cloth. Close up the muslin nice and tight with another twisty or rubber band.

4. repeat steps 1-3 with the rest of your eggs.

5. Pop the eggs into a
pot. Fill with water to cover eggs completely. Then, add about three tablespoons of white vinegar.

6. Bring water to a boil, turn heat down, and simmer for 20 minutes or longer.

7. Remove the eggs with tongs or a spoon. Let them cool and then unwrap them to reveal your gorgeous eggs.

Have fun! Happy Easter everyone!!

Monday, March 29, 2010

Uh, Katie?

Where did that blog post go?

Monday, March 22, 2010

handmade invitations


We're having a party and I really wanted to send handmade invitations. I loved these. I decided on a little Asian flare for ours - inspired by my grandmothers influence of teaching me origami at a young age I decided to use an origami lily. I actually went to YouTube and watched a tutorial on making the lily. The girls voice and squawking birds got on my nerves, I muted it, and watched away. It took energy and time to make the invitations, but in the end I am glad people "got mail" in the literal way and not the cyber. =)


Happy St. Paddy's!


Late, of course. I made 30 of these for story time. They were a big hit despite the fact that I rushed them to make enough for all the kids. I will definitely make them next year and take my time making just a handful for my own children. Sewing vinyl was surprisingly easy. I may sew some egg-shaped ones for Easter.


One more thing...please tell me I won't be an awful mother if I make one of these for Ana. I'm still a little bitter.

Saturday, March 13, 2010

Thank you Leah!!!!

Thank you for inspiring me to do this!!!!!! You are amazing!

Tuesday, March 9, 2010

Sisal Pendant Light

The lamp in my living room was my nemesis. There are worse ones out there, sure, but this one has a shade that collects dust like it's its job, has a bulky shape, and in my opinion is generally just a total downer . So....
I moved it to another room and went lightless for a few months....
Until I remembered this awesome project that I found. I've been wanting to make this forever, and I finally got a chance this weekend. Instead of hemp, I decided to use sisal b/c I like the messy texture and the color looked better for this spot.

Sisal twine (I got mine at Hardware city, our local hardware store, but I'm sure most any hardware store would carry it. Look in the rope section. The whole 200+ foot roll was about $6:
Then I got this big playground ball from Target ($2.88)

And I reached my hand into this:

and coated the sisal twine a few inches at a time by running it through my modge-podge covered hands (very messy so you want to be sure to put down a dropcloth of some sort). As I covered the twine in modge podge I began winding it around the ball in a haphazard criss cross pattern. I left a few inches uncovered at one end so that I could get the ball out later...Then I let it dry for two days, before deflating the ball and pulling it out through the hole. It stuck to the sides a little bit so I gently reached in and peeled it away from the places it was sticking.
Then I used a light kit from ikea ($3) and ran it through one of the criss cross openings in the top, and mounted it with a ceiling hook:

Monday, March 8, 2010

samesies?

I think Molly and I may have the same pattern for bean bags. I would put the link, but I have no idea how you do that. I feel like a computer dumb bucket - how do you not put the link, but a simple word to go to a site? Anyways, Michael loves rolling it, climbing on it and as you can see perching on it! This was my first sewing project!
My next big sewing endeavor is cloth diapers - some amazing women have me convinced it is the way to go! I hope I will be able to post soon the diapers and my thoughts on the whole thing.


Thursday, March 4, 2010

I am on fire with the skirts.

I used this tutorial to make flowers. They were easy but took about 30 minutes each while I watched a movie.And I used this tutorial to make the skirt itself. Beware the annoying Madonna that plays over and over on the website. You should definitely shut off your speakers. I made the flowers with felt and thread but I attached them to the skirt with embroidery floss. They are designated as dress-up so I wanted them to be sturdy.
Mission accomplished: It spins beautifully.

Monday, March 1, 2010

Easy girls skirt.


I found this tutorial a few weeks ago and when I found a free pair or cords I decided to make it. I modified it a bit since I had to dismantle a pair of pants but the concept is the same, my skirt just has a few more vertical seams than hers and my flowers are much more basic. I recommend this if you are learning how to sew for your kids. The shape is very forgiving and corduroy is ideal for a play skirt so it doesn't matter if it gets beat up.

If you sew and have boys you should check out this website. She dedicated a month to boy projects. Some are difficult but most are manageable for someone who is learning.

Bean Bag Chair

I made this as a birthday gift for our nephew. It's actually an easy pattern...but I managed to make it take FOREVER by trying to cut corners. I swore off ever making one again, but Chloe loves it... so there ya go.

It has an inner shell (that holds all the static-y little balls we still find all over our house) and an outer shell that can be taken off (with Velcro) to be washed.

I chose a space theme for the fabric.